Showing posts with label BFSU. Show all posts
Wednesday, February 6, 2013
Preschool Science Experiments and Exploration
I come from a family of scientists, so naturally science is one of my favorite subjects to do with my children. I absolutely love watching their brains at work as we do experiments and they observe, ask questions, try new things, and make inferences - lots of fun!
I rounded up links to some of the science activities I've blogged about over the past year (twins were 2.5-3.5 years old)..
Sunday, August 12, 2012
Preschool Science: Learning about Air
A couple days ago, the girls (3 years old) and I did some science experiments to learn about the properties of air. They were inspired by both Building Foundations for Scientific Understanding (BFSU) and the book Science in Seconds for Kids by Jean Potter (which contains over 100 experiments that have very little setup time). Here are the four experiments we did...
Wednesday, March 14, 2012
Exploring Sound: Science, Math, and Music Activity
Last weekend we did Lesson C-2 in Building Foundations of Scientific Understanding (BFSU) - "Sound, Vibrations, and Energy", and I decided to integrate the lesson with some fun music and math activities.
First we made string instruments out of rubber bands and cookie cutters:
The sound out of these was not that impressive, but the kids enjoyed holding them up to their ears and also strumming them and then feeling the vibrations in the cookie cutters. We talked about how the vibrations from the rubber bands travel through the particles in the air to their ears (they understand the concept of air as a substance so maybe they got it, or maybe there's just some association made between vibrations and sound, which is fine too). Then they put their ears on the wooden table and listened to sounds through this solid (they were surprised by the result and giggled).
Next I filled up glasses with varying amounts of water and let them make some music. The girls know how to distinguish high/low pitches and ascending/descending intervals from Kinderbach, so we played some games identifying the difference in the sounds each glass made:
We've been doing a lot of work with patterns and number recognition lately, so I wanted to demonstrate the different ways we can make patterns with music.
We composed music using different manipulatives. One way was to put numbers in front of the glasses, and then, moving from left to right, strike each glass the number of times displayed on the corresponding card. L really enjoyed rearranging the numbers and then asking me to play her composition. Another way we composed music was to use two instruments (a glass, and a container for a drum), and assign a different color to each one. Then we combined MegaBlocks to make a pattern to play:
For example, to play the composition above, you would play glass-drum-drum-glass-drum. E was really good at this activity, probably because it combined her love of building with blocks with her love of music.
Finally, we took out our whole collection of percussion instruments and played some games reading quarter notes:
Sometimes I'd hit a drum a certain number of times and the girls had to pick the card that depicts the correct number of notes, and sometimes I'd pick a card and they would have to play the rhythm. I think they can finally identify a group of four objects, which is something they've struggled with for a while in our RightStart Math curriculum. In the picture above, L is playing the game, while E is making the letter "T" with her drumsticks (they're so creative!).
Since the kids enjoyed this very much, I plan on expanding on these types of activities to include different rhythms and patterns. I'll have to also search the web for more ideas on experiments to do with sound - I'm sure there are other fun experiments out there.
First we made string instruments out of rubber bands and cookie cutters:
The sound out of these was not that impressive, but the kids enjoyed holding them up to their ears and also strumming them and then feeling the vibrations in the cookie cutters. We talked about how the vibrations from the rubber bands travel through the particles in the air to their ears (they understand the concept of air as a substance so maybe they got it, or maybe there's just some association made between vibrations and sound, which is fine too). Then they put their ears on the wooden table and listened to sounds through this solid (they were surprised by the result and giggled).
Next I filled up glasses with varying amounts of water and let them make some music. The girls know how to distinguish high/low pitches and ascending/descending intervals from Kinderbach, so we played some games identifying the difference in the sounds each glass made:
We've been doing a lot of work with patterns and number recognition lately, so I wanted to demonstrate the different ways we can make patterns with music.
We composed music using different manipulatives. One way was to put numbers in front of the glasses, and then, moving from left to right, strike each glass the number of times displayed on the corresponding card. L really enjoyed rearranging the numbers and then asking me to play her composition. Another way we composed music was to use two instruments (a glass, and a container for a drum), and assign a different color to each one. Then we combined MegaBlocks to make a pattern to play:
For example, to play the composition above, you would play glass-drum-drum-glass-drum. E was really good at this activity, probably because it combined her love of building with blocks with her love of music.
Finally, we took out our whole collection of percussion instruments and played some games reading quarter notes:
Sometimes I'd hit a drum a certain number of times and the girls had to pick the card that depicts the correct number of notes, and sometimes I'd pick a card and they would have to play the rhythm. I think they can finally identify a group of four objects, which is something they've struggled with for a while in our RightStart Math curriculum. In the picture above, L is playing the game, while E is making the letter "T" with her drumsticks (they're so creative!).
Since the kids enjoyed this very much, I plan on expanding on these types of activities to include different rhythms and patterns. I'll have to also search the web for more ideas on experiments to do with sound - I'm sure there are other fun experiments out there.
Wednesday, February 22, 2012
Early Science: Learning About Gravity
We continued our Building Foundations of Scientific Understanding (BFSU) curriculum with lesson D-1: "The Earth's Gravity; Horizontal and Vertical". It's easy to be skeptical about teaching preschoolers about gravity, but when you think about it, how much does the typical adult know about gravity? Kids are beings capable of making observations just like adults are. In fact, L and E (31 months) already knew a lot about gravity before I even started the lesson: I held up a ball and asked the girls if I drop it whether it would fly to the ceiling or land on the floor (of course they knew the right answer). They also knew which way a ball would roll on a tilted surface without any explanation. I explained that gravity was something we can't see, but it is a force that pulls things towards the ground. L told me that when she jumps she goes up, but always lands on the ground. She also made the connection that when she pushes her sister in her Bumbo chair, she is applying a force (well she didn't quite state it that eloquently, but she made the connection all by herself).
We spent an entire morning doing fun experiments that demonstrate 'gravity'. We dropped lots of objects and watched them fall, and jumped off things (while I reiterated that we always land on the ground because gravity pulls us down).
Then I constructed a pendulum for the girls to explore, out of their Tubation set (any pvc piping would work too), and some weights on a string:
The girls swung the pendulums and then waited until they stopped, as I pointed out that when they stop they always point down in the direction of the pull of gravity. They tilted the frame to the side and observed the pendulum's orientation:
Then I altered the frame to have open ends at the top. The girls took turns dropping a unit cube into the center when the frame was level. I asked them to observe the orientation of the pendulums and tell me where they think the cube went. They both pointed to a spot at the top of the frame just below where they had dropped the block. Then they tilted the frame to one side and observed the block fly out:
The girls have been learning the terms "parallel" and "perpendicular" from Rightstart Math, so I used those words, as well as introduced "horizontal" and "vertical", to describe the orientation of the pendulum in relation to the top of the frame (and gravity). The girls explored the pendulums for quite a while, trying different things like releasing them from various heights, making the strings shorter, etc..
Then while I was setting up some other experiments, the girls played with dropping objects into water. Originally I was planning on using our plastic weight set to show them that light and heavy weights will sink to the bottom of the water at the same time. However our weights floated, turning this into a lesson on buoyancy instead! We repeated using magnets:
I'm glad we used magnets, because I showed them that we can get them to lift up out of the water, as well - the magnetic force was stronger than gravitational force.
We've been doing a lot of weighing activities with their bucket-scale lately, so I wanted to demonstrate weight in a different way. I created a simple spring-scale out of a clipboard, rubber band, dental floss, and a paper cup. I think the spring-scale makes it easier to associate weight with gravity. We put different numbers of weights in the cup, and L helped me draw a line showing where the top of the cup was. Of course she wanted to do it all by herself (I'm surprised she even let me write the numbers):
L and E took turns adding and removing weights and observing the effects. Then they took a break to take some scientific notes:
The final project of the day was inspired by one of those large funnels at the mall that into which you drop pennies and watch them spin around. I cut through the radius of a paper plate and turned it into a cone. I made a little shelf that a bead could rest on before the girls gave it a push and watched it spin around towards the center (gravity!). We dipped the bead in blue paint and tried to record its path. The girls had lots of fun with this, especially E who repeated the activity over and over:
I don't know who had more fun with our lesson on gravity - me or the girls! I'm not sure at what level the girls are grasping these concepts, but I think that the activities from BFSU will build a foundation that the girls can build on as they learn some of these scientific concepts in a more formal setting when they get older. Furthermore, they are making observations, playing, and having a great time, which is what really counts.
We spent an entire morning doing fun experiments that demonstrate 'gravity'. We dropped lots of objects and watched them fall, and jumped off things (while I reiterated that we always land on the ground because gravity pulls us down).
Then I constructed a pendulum for the girls to explore, out of their Tubation set (any pvc piping would work too), and some weights on a string:
The girls swung the pendulums and then waited until they stopped, as I pointed out that when they stop they always point down in the direction of the pull of gravity. They tilted the frame to the side and observed the pendulum's orientation:
Then I altered the frame to have open ends at the top. The girls took turns dropping a unit cube into the center when the frame was level. I asked them to observe the orientation of the pendulums and tell me where they think the cube went. They both pointed to a spot at the top of the frame just below where they had dropped the block. Then they tilted the frame to one side and observed the block fly out:
Then while I was setting up some other experiments, the girls played with dropping objects into water. Originally I was planning on using our plastic weight set to show them that light and heavy weights will sink to the bottom of the water at the same time. However our weights floated, turning this into a lesson on buoyancy instead! We repeated using magnets:
I'm glad we used magnets, because I showed them that we can get them to lift up out of the water, as well - the magnetic force was stronger than gravitational force.
We've been doing a lot of weighing activities with their bucket-scale lately, so I wanted to demonstrate weight in a different way. I created a simple spring-scale out of a clipboard, rubber band, dental floss, and a paper cup. I think the spring-scale makes it easier to associate weight with gravity. We put different numbers of weights in the cup, and L helped me draw a line showing where the top of the cup was. Of course she wanted to do it all by herself (I'm surprised she even let me write the numbers):
L and E took turns adding and removing weights and observing the effects. Then they took a break to take some scientific notes:
The final project of the day was inspired by one of those large funnels at the mall that into which you drop pennies and watch them spin around. I cut through the radius of a paper plate and turned it into a cone. I made a little shelf that a bead could rest on before the girls gave it a push and watched it spin around towards the center (gravity!). We dipped the bead in blue paint and tried to record its path. The girls had lots of fun with this, especially E who repeated the activity over and over:
I don't know who had more fun with our lesson on gravity - me or the girls! I'm not sure at what level the girls are grasping these concepts, but I think that the activities from BFSU will build a foundation that the girls can build on as they learn some of these scientific concepts in a more formal setting when they get older. Furthermore, they are making observations, playing, and having a great time, which is what really counts.
Monday, February 20, 2012
Organizing Objects into Categories
L and E are almost 31 months old. This week we started going through the lessons in the K-2 curriculum Building Foundations of Scientific Understanding by Bernard Nebel (BFSU for short). We started with lesson A/B-1, which is the concept of organizing things into categories. Sorting is an activity I've been doing with the girls for a long time (sorting various items by shape and color, cleaning up room and putting toys in specific locations by type, etc..). So I wanted to reinforce the concepts they already know about grouping objects by attributes, introduce the terminology "organization" and "category", and also challenge them to think about different ways that the same objects can be organized.
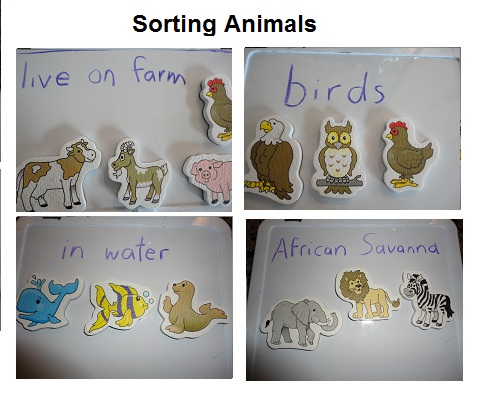
We have a collection of foam magnets representing different objects. I decided to use these magnet representations of objects rather than the actual objects because I think it adds a bit of additional difficulty since the girls have to think about the properties of the real object (for example, in real life a feather is soft, but the magnet representation is not).
The way we played this game, is I would put a collection of approximately 10 magnets at a time on a cookie sheet and then ask the girls if they see some objects that have things in common that we could use to categorize them. Sometimes the girls had good suggestions (like organizing based on whether an object was an animal or not, or whether it was a toy, or by color), and other times I came up with the category to give them ideas of the different ways we can look at these objects. Once we decided on categories, the girls picked out the objects that fit into each category and transferred them to the smaller magnetic boards. Here are some of the ideas that we came up with:
It would be really easy to use clipart, photos, or web images to create flashcards to serve the same purpose as these magnets. I have an open request to my husband to get me a large oil drip pan the next time he is at the hardware store, which we can use as a giant magnet board (I've seen the idea all over Pinterest). Once we have that larger magnet board, I want to repeat the idea and create some Venn diagrams, so the girls can see that the same object can exist in multiple categories (a chicken is a bird, but also lives on the farm, etc..).
L and E really liked the categorization activity and we played a long time. We also played a memory game where I put some objects on the cookie sheet and then turned it around and asked the girls to recall the objects. L has amazing (almost photographic) memory. I did show them that it is even easier to remember the objects if they put them into categories in their mind and then recall them based on the categories. They did really well if I reviewed the categories and objects with them, but didn't quite grasp the concept of employing that technique in their head on their own (which is fine - they are only 2.5 years old, after all).
I peeked ahead at the lessons we'll be doing later on in the BFSU curriculum, and I think the girls are going to love the categorizing in future activities (solid/liquid/gas, living/nonliving, animal classifications, etc..).
We have a collection of foam magnets representing different objects. I decided to use these magnet representations of objects rather than the actual objects because I think it adds a bit of additional difficulty since the girls have to think about the properties of the real object (for example, in real life a feather is soft, but the magnet representation is not).
The way we played this game, is I would put a collection of approximately 10 magnets at a time on a cookie sheet and then ask the girls if they see some objects that have things in common that we could use to categorize them. Sometimes the girls had good suggestions (like organizing based on whether an object was an animal or not, or whether it was a toy, or by color), and other times I came up with the category to give them ideas of the different ways we can look at these objects. Once we decided on categories, the girls picked out the objects that fit into each category and transferred them to the smaller magnetic boards. Here are some of the ideas that we came up with:
It would be really easy to use clipart, photos, or web images to create flashcards to serve the same purpose as these magnets. I have an open request to my husband to get me a large oil drip pan the next time he is at the hardware store, which we can use as a giant magnet board (I've seen the idea all over Pinterest). Once we have that larger magnet board, I want to repeat the idea and create some Venn diagrams, so the girls can see that the same object can exist in multiple categories (a chicken is a bird, but also lives on the farm, etc..).
L and E really liked the categorization activity and we played a long time. We also played a memory game where I put some objects on the cookie sheet and then turned it around and asked the girls to recall the objects. L has amazing (almost photographic) memory. I did show them that it is even easier to remember the objects if they put them into categories in their mind and then recall them based on the categories. They did really well if I reviewed the categories and objects with them, but didn't quite grasp the concept of employing that technique in their head on their own (which is fine - they are only 2.5 years old, after all).
I peeked ahead at the lessons we'll be doing later on in the BFSU curriculum, and I think the girls are going to love the categorizing in future activities (solid/liquid/gas, living/nonliving, animal classifications, etc..).
Subscribe to:
Posts (Atom)